
In today's cable industry, there are three main technologies used for measuring cable diameter and ovality: laser diffraction, laser scanning, and optical projection.
Products developed based on these three technologies have their own advantages and disadvantages. While products based on laser scanning and optical projection have been introduced by domestic companies in China quite early, the technology based on laser diffraction has not made a breakthrough, leading to certain products in the field being controlled by foreign companies for an extended period.
From 2015 to 2020, Screate DALA, after more than four years of dedicated research, successfully mastered the application of laser diffraction technology in the field of cable measurement, breaking the technological pattern in the market. They have introduced multiple measurement products utilizing diffraction technology.
Next, let me introduce these three measurement techniques: laser diffraction method, laser scanning method, and optical projection method.
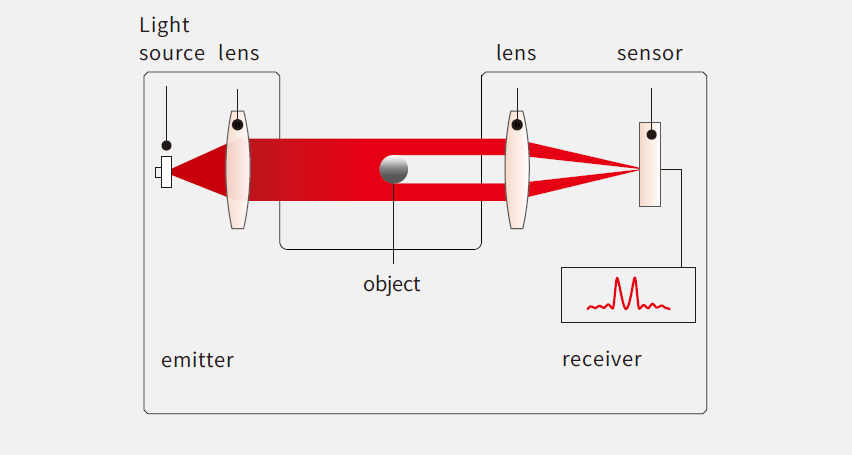
Laser diffraction includes Fraunhofer diffraction and Fresnel diffraction. The principle is based on the wave characteristics of light. In the shadow contour of the measured object projected by the laser, diffraction fringes contain the geometric dimension information of the object. By detecting and calculating these fringes, the diameter and ovality of the object can be accurately obtained.
This technique uses a collimating lens to collimate the laser into a parallel beam, which illuminates the object being measured. The imaging system projects the object's diffraction image onto a CCD receiver. By detecting and calculating the diffraction fringes, the object's dimensions can be determined.

1. No motor structure, eliminating concerns about measurement errors caused by vibrations or minor changes in the position of optical components, ensuring long-term stable use.
2. High repeatability, especially advantageous for measuring fine wires between 0.005mm and 0.1mm, making it ideal for fine wires.
3. Not affected by laser amplitude attenuation.
4. Long-term use with stable measurements, without the need for recalibration.
1. Limited measurement range, generally less than 1mm, making it difficult to measure larger cable diameters.
2. Sensitive to dust and smoke, increasing the complexity of the structural design.
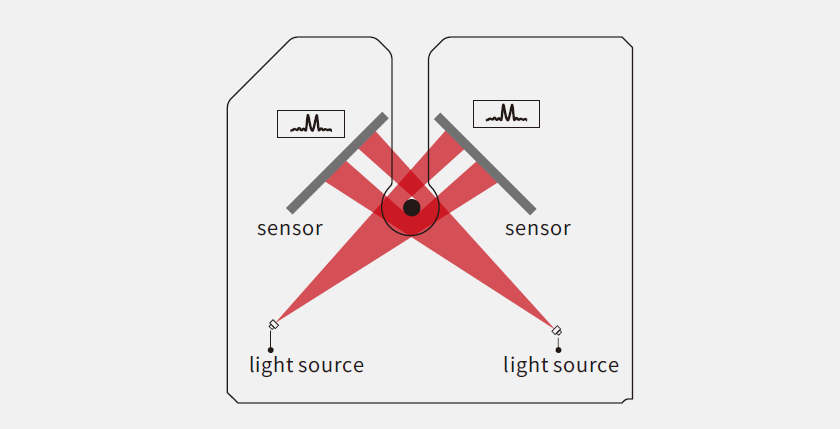
Measurement devices based on this technology do not require optical lenses but need two or more optical paths to function correctly.

In the above diagram of a two-axis measurement device, laser beams emitted from two axes at 90° project the geometric contour of the measured object onto CCDs also positioned at 90°. By analyzing the diffraction images, the diameter and ovality of the object can be calculated.
1. No motor structure, ensuring long-term stable use without concerns about measurement errors due to vibrations or minor changes in the position of optical components.
2. No optical lenses or motors, significantly reducing maintenance procedures.
3. Highly suitable for online measurement of cable diameter and ovality, with very simple product structure and higher reliability.
4. Not affected by laser amplitude attenuation.
5. Long-term use with stable measurements, without the need for recalibration.
1. High development difficulty and long cycle time.
2. Sensitive to dust and smoke, increasing the complexity of the structural design.
3. Difficult to measure fine wires below 0.05mm.
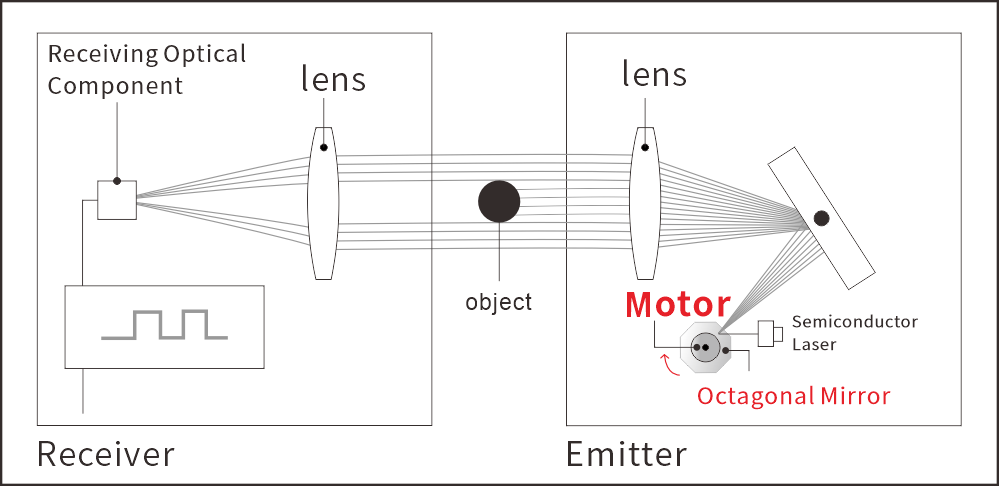
Principle of the Laser Scanning Method: A laser beam emitted from a semiconductor laser is projected onto a rotating multi-faceted prism. After being reflected by a plane mirror, it passes through a collimating lens (Fθ lens) and scans the object to be measured. The beam is focused by a receiving lens and converted into an electronic signal proportional to the received light intensity by a photodiode. The size of the object is calculated based on the time the beam is blocked by the object, forming a shadow.

1. Relatively simple technology, early maturity, with many companies developing products, offering a wide range of choices.
2. Lower sensitivity to dust and smoke, reducing the difficulty of structural development.
3. Not affected by laser amplitude attenuation.
4. Large measurement range.
1. The product contains a high-speed motor that drives the multi-faceted mirror, significantly impacting the durability and reliability of the product.
2. The reliability of multi-axis products capable of measuring ovality is further reduced.
3. Difficult to lower the minimum measurement limit.
Common brands include Mitutoyo, BETA, Zumbach, PROTON, Omega, Huihuang, Lester, and Mingrui.
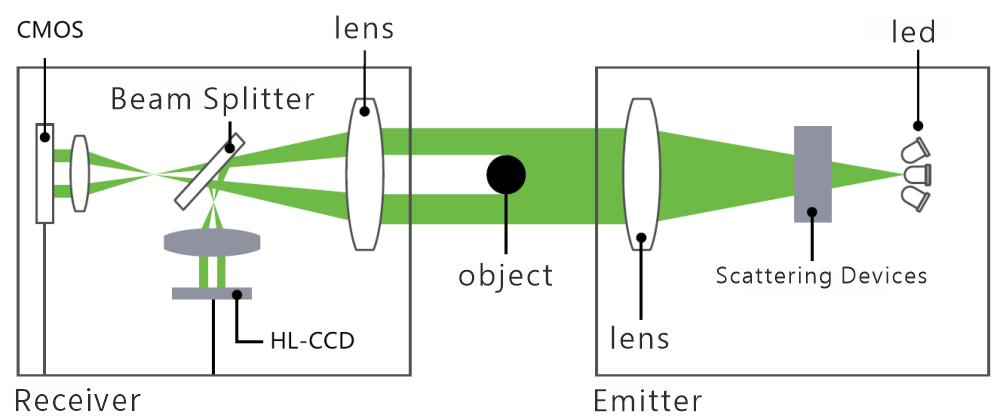
The optical projection method involves high-intensity LED light passing through a diffuser and being collimated into a parallel beam by a collimating lens. This parallel light beam illuminates the object being measured. The imaging system then projects the object's image onto a CCD receiver. By detecting and calculating the shadow edges of the image, the dimensions of the object are obtained. The core of this method is the telecentric optical imaging system.

1) No motor structure is needed, ensuring the reliability of the product.
2) The technology is relatively simple and matured earlier.
1) The structure is complex, and integrating multi-axis products to measure ellipticity is challenging.
2) It is susceptible to the effects of light source amplitude attenuation and accumulation of dust on lens surfaces.
3) It is difficult to reduce the measurement lower limit.
Common brands of diameter measuring equipment based on optical projection method include: KEYENCE, Lanpeng.
Through the introduction of non-contact measurement techniques in the field of cable diameter measurement, we can see that products developed based on different measurement technologies have their own advantages and disadvantages. When choosing products, it is necessary to select the appropriate ones according to the application scenario to achieve the best performance advantages.