46 KHz/axis sampling rate, capable of imaging protrusion and depression defects
Measurement Principle
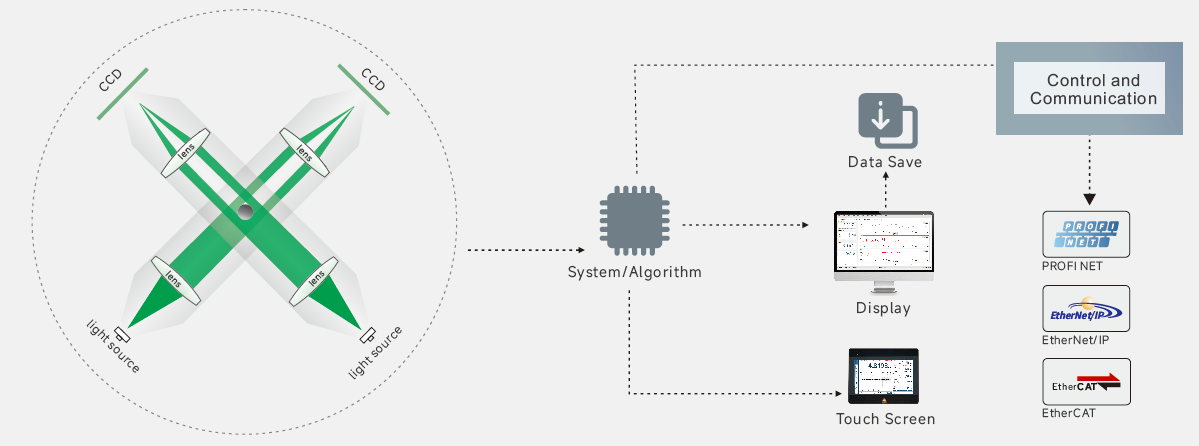
When the object is caught by laser beam passed through lens, a bright and dark area will be formed on CCD,then the object dimension will be accurately calculated through software analysis and calculation.

Measurement is accurate even if there is water and dust
Thanks to individual optical system and measurement algorithm,the measurement data of TL-3000 is still accurate at complex environment.
The device environmental adaptability reaches to IP65.Besides,air filter is available to prevent lens front side from contamination ,ensuring measurement data is accurate at various extremely complex environment.

Defect image display function, reducing the trouble some of finding defects

Technical parameter
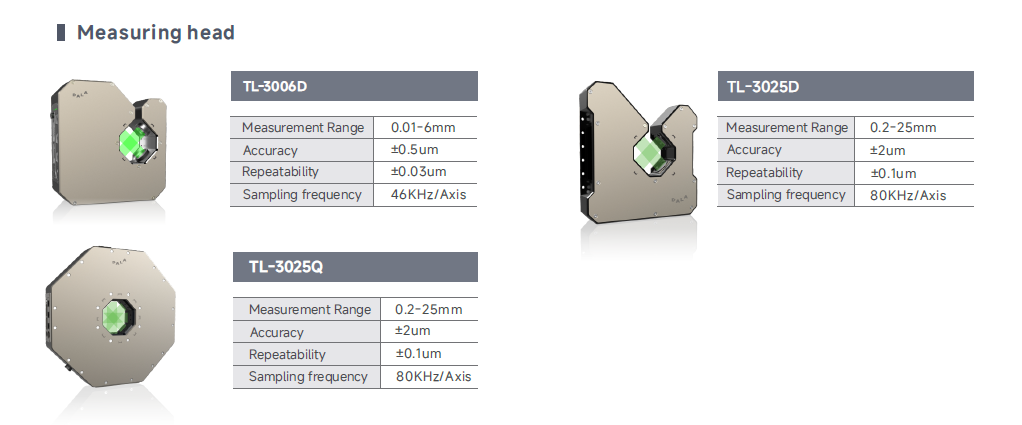
| Model | TL-3006D | TL-3025D | TL-3025Q |
| Axis | 2-axis | 2-axis | 4-axis |
| Measurement range | 0.01~6mm | 0.2~25mm | 0.2~25mm |
| Repeatability | ±0.03μm(1) | ±0.1μm(2) | ±0.1μm(2) |
| Accuracy | ±0.5μm(3) | ±2μm(4) | ±2μm(4) |
| Sampling frequency | 46KHz/Axis | 80KHz/Axis | 80KHz/Axis |
| Size(L*W*H) | 180*198*60mm | 270*296*60mm | 382.5*384.9*70mm |
| Min defect length | 0.2mm@560m/min 0.5mm@1400m/min | 0.2mm@960m/min 0.5mm@2400m/mi | |
| Min defect height | 0.01mm | ||
| Dimensional Measurement Data | Diameter, Ovality(Width &Thickness),Lumps, Necks | ||
| Application | Round wire, Flat wire, Transparent wire, Hose and Bar etc. | ||
| Power supply | 24V ±5%,Max. 75W | ||
| Display | LED | ||
| Communication interface | Standard:RS485 (MODBUS RTU)、Bluetooth Option:PROFIBUS、PROFINET、EtherNet/IP etc industrial bus or industrial Ethernet(5) | ||
| Electrical interface | Standard:Digital output(relay), Digital input, Analog input, Encoder pulse input port Options: feedback control(5) | ||
Environmental adaptability | Working Tem. | 0~50℃ | |
| Working Env. | 20~85%RH(No condensation) | ||
| Brightness | incandescent light, fluorescent lamp 3000lx or less | ||
| Vibrating resistance | 10~55Hz full amplitude 1.5mm in XYZ direction for 2 hours | ||
| Impact resistance | 10G/6ms | ||
| IP grade | IP65 | ||
| Data collection analysis | Options:TDC 3000, DMS1000, C3, DS14ZT | ||
| Out-of-tolerance alarm | Support | ||
| Transparent mode | Support | ||
NOTE:
(1)Set average number of times to 1150 and measure the ±2σ value of the round standard rod of diameter 10mm at the measurement area center.
(2)For object diameter of 10mm, the measurement accuracy is ±2um when it moves in the center of 8*8mm;
(3) Move φ1mm round rod in the measurement area of 2*2mm and conduct measurement error;
(4) Move φ10mm round rod in the measurement area of 8*8mm and conduct measurement error;
(5) Industrial communication module and PI feedback control module is installed before ex-factory,so notify the demand before placing an order.
